Application Instructions: |
|
| 1. | Even though Arctic Silver II is specifically engineered for high electrical resistance, you should keep the compound away from processor, memory, and motherboard traces and pins. There is a possibility that dust or metal particles and/or shavings carried by the airflow inside the computer case could contaminate the compound and increase its electrical conductivity. |
| 2. | ONLY Arctic Silver II should be between the processor core and the heatsink. Remove any thermal pads or other interface material from the heatsink before applying the Arctic Silver. |
| Never use any oil or petroleum based cleaners (WD-40, citrus based cleaners and many automotive degreasers) on the base of a heatsink. The oil, which is engineered to not evaporate, will fill in the microscopic valleys in the metal and significantly reduce the effectiveness of any subsequently applied thermal compound. | |
| If your heatsink has a thermal 'pad' mounted on it, this pad must be removed before using Arctic Silver II. Thermal pads are made with paraffin wax that melts once it gets hot. When it melts, it will fill in the microscopic valleys in the heatsink with wax. To minimize the permanent contamination of the mounting surface with wax, the thermal pad should be removed before it is used and melted. Never use heat or hot water to remove the pad, the heat will melt the wax into the heatsink. | |
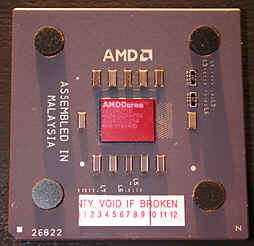
| 3. | On the CPU, Arctic Silver II should only be applied to the top of
the core. The core is the raised rectangle in the center of the CPU and is highlighted in
red in the photos below of an AMD and Intel CPU. |
| 4. | Clean the mating surfaces completely with a low residual solvent (isopropyl alcohol will work) and a LINT FREE cloth. (i.e. lens cleaning cloth) If the heatsink surface has had thermal compound previously applied, the surface should be thoroughly scrubbed and cleaned with isopropyl alcohol or acetone (nail polish remover). It is important to keep the surfaces free of foreign materials and NOT to touch the surfaces (a hair, piece of lint, and even dead skin cells can significantly affect the thermal interfaces performance, especially on modern small core CPUs as the surface area is already severely limited). In addition, oils from your fingers can adversely affect the performance by preventing the micronized silver fill from directly contacting the metal surface. (Finger prints can be as thick as 0.005") |
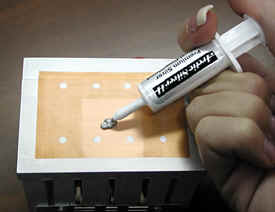
| 5. | Determine what area on the base of the heatsink will contact the CPU
core once the heatsink is mounted. Squeeze enough Arctic Silver II onto the center of this
area to create a small mound as shown in the photo below on the left. |
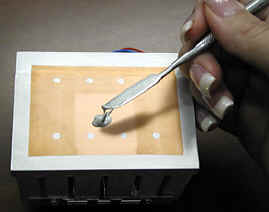
| 6. | 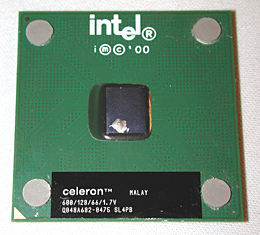 Using a clean razor, the clean edge of a
credit car, a clean knife, or some other appropriate clean tool, pick op a small dab of
the Arctic Silver compound from the mound you put on the heatsink as shown in the photo
above on the right. Using a clean razor, the clean edge of a
credit car, a clean knife, or some other appropriate clean tool, pick op a small dab of
the Arctic Silver compound from the mound you put on the heatsink as shown in the photo
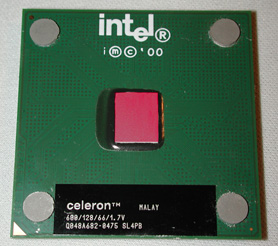
above on the right.Put the dab of Arctic Silver II you removed from the heatsink base onto one corner of the CPU core as shown in the photo to the right. Only apply the thermal compound to the top of the actual CPU core. (Also known as the slug or die.) In the photo to the right it is the small raised blue rectangle in the middle of the Celeron II processor. On an AMD Duron or T-bird, it is the small raised rectangle in the center of the AMD processor. Only a very small amount of Arctic Silver is needed on modern CPU cores, about 1/2 the size of an uncooked grain of short-grain white rice or 1/4 of a BB. |
| 7. | 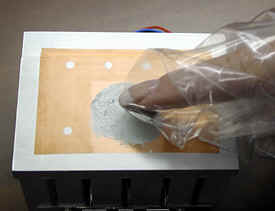 Tint the
bottom of the heatsink in the area where the CPU core will contact it. Put a finger into a
plastic bag and thoroughly rub the compound into the base of the heatsink using both
clockwise and counter-clockwise circular motion. This will insure optimum filling of the
microscopic valleys in the metal. Tint the
bottom of the heatsink in the area where the CPU core will contact it. Put a finger into a
plastic bag and thoroughly rub the compound into the base of the heatsink using both
clockwise and counter-clockwise circular motion. This will insure optimum filling of the
microscopic valleys in the metal. DO NOT use your bare finger to apply or smooth the compound (skin cells, and oils again)
|
| 8. |  Spread the Arctic Silver II over the CPU
core as shown in the photo to the right. The small amount from the photo in step 5 above
has been carefully spread over the top of the core using a single edge razor blade. A
razor blade or the clean edge of a credit card can be used as the application tool. You
may use whatever tool you choose as long as it is CLEAN and allows you to control the
application area and thickness. Spread the Arctic Silver II over the CPU
core as shown in the photo to the right. The small amount from the photo in step 5 above
has been carefully spread over the top of the core using a single edge razor blade. A
razor blade or the clean edge of a credit card can be used as the application tool. You
may use whatever tool you choose as long as it is CLEAN and allows you to control the
application area and thickness.
Here is a close up of the top of the CPU core with a fairly thick layer of Arctic Silver II applied. Lapped heatsinks would probably require a thinner layer while heatsinks with very rough bases could require a slightly thicker layer. |
| 9. | RECHECK to make sure no foreign contaminants are present on either the bottom of the heatsink or the top of the CPU core. Mount the heatsink on the CPU in the proper orientation per the heatsink's instructions. Verify that the pressure point on the clip is directly above the CPU core. |
| 10. | PRESS the two surfaces together ONLY. Minimize any "twisting" or lateral "sliding" in either plane in an attempt to mate the "peaks" of the surfaces together. When you twist or slide one surface against the other, "peaks" on one or both surfaces will travel over areas where two "valleys" should come to rest. The peaks will scrape away compound that is needed to fill the void between the valleys that will oppose each other when the surfaces are in their final position and cause small voids (air gaps). ANY air gap will significantly increase thermal resistance in an otherwise GOOD interface. If the thermal compound is properly made and of the proper consistency, direct non-sliding pressure vertical to the mating plane will be more than enough to insure that the surfaces "bottom out". Additionally, "sliding" the surfaces together may cause one surface to scratch/gouge the other possibly opening up a larger inter-surface gap which will increase thermal resistance. |
| 11. | Secure the heatsink with the supplied clips or other hardware. Carefully check
from all four sides that the heatsink is sitting flush on the CPU core. It is possible for
some heatsinks to sit at an angle on the CPU core even when they are properly oriented and
the clip is properly engaged as shown in the photo below. Notice how there is more space
between the right side of the heatsink base and the CPU ceramic than between the left side
of the heatsink base and the CPU ceramic. This heatsink is tilting to the left and is not
making proper contact with the CPU core. |
Removal Instructions (From Hardware): |
|
| 1. | Arctic Silver II can easily be removed from hardware using the proper cleaners
and tools. For general clean-up, a cloth or paper towel will work well. Intricate cleaning
can be accomplished with Q-tip swabs. An old toothbrush can often get the compound out of
crevices that other tools cannot reach. The recommended cleaners are: CPU Core:
Heatsink:
Remember:
CPU Ceramic: (Use any of the following cleaners.)
|
| 2. | If you use any of the suggested products to remove Arctic Silver II from the CPU ceramic or heatsink base, always do a final cleaning with isopropyl alcohol to remove any residue from the cleaner. |
Removal Instructions (From Your Hands): |
|
| 1. | Wash your hands with any dish washing detergent (Dawn, Lux, Palmolive, Etc.) rather than hand soap. (Do not use soap for an automatic dishwasher.) |
 Re-clean the heatsink surface with a LINT FREE cloth. Do not use any solvent
or fluid. You may notice that the base of the heatsink is slightly discolored even after
all the compound would seem to have been removed. That is the Arctic Silver II filling the
microscopic valleys.
Re-clean the heatsink surface with a LINT FREE cloth. Do not use any solvent
or fluid. You may notice that the base of the heatsink is slightly discolored even after
all the compound would seem to have been removed. That is the Arctic Silver II filling the
microscopic valleys.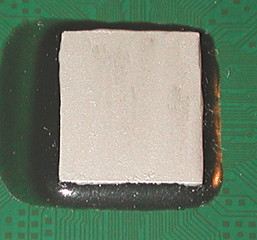 The flatter the mating surfaces, the
thinner the layer that is required. Stock processors and/or heatsinks with normal
surface irregularities will require a layer 0.003" to 0.005 thick as shown below
to fill the resultant gaps. (Equal to the thickness of about 1 sheet of
standard weight paper.) Properly lapped heatsinks with mirror finishes will only
require a translucent haze.
The flatter the mating surfaces, the
thinner the layer that is required. Stock processors and/or heatsinks with normal
surface irregularities will require a layer 0.003" to 0.005 thick as shown below
to fill the resultant gaps. (Equal to the thickness of about 1 sheet of
standard weight paper.) Properly lapped heatsinks with mirror finishes will only
require a translucent haze.